 STARLOG
StarLog Owner's Guide for Windows
Also available: StarLog Owner's Guide for Mac, Moon Ship User's Manual, Moon Base User's Manual · Launch Day Quick Reference (PDF)
Welcome to StarLog
StarLog shows you exactly how your rocket flew: the climb, the peak and the descent, charted on your PC. It works with two devices from StarLog™ MoonBeam:
- Moon Ship rides in your rocket. It measures altitude 20 times a second, keeps a full log of every flight and radios it to the ground live.
- Moon Base sits at the launch site. It receives the live data, shows the flight's stage on its lights and saves every flight to its microSD card.
Plug either one into your PC and StarLog downloads the flights, charts them and keeps them in a logbook.
What you need
- A PC with Windows 10 or Windows 11.
- A USB-C data cable. Some cables only charge and won't work; if StarLog can't find a device, try another cable first.
- No internet connection is needed to use StarLog. When you are online, it checks for updates.
Installing StarLog
Installing takes about two minutes. Everything StarLog needs is built in, and no administrator password is needed: StarLog installs just for you.
- Open your Downloads folder and double-click StarLog_Setup_V3.14.exe (the version number may be newer).
- The first time, Windows may show Windows protected your PC, because this early version isn't registered with Microsoft yet. Click More info, then Run anyway.
- Setup shows where it will install StarLog. Click Next.
- Setup offers two options. Leave both ticked: Create a StarLog icon on the desktop and Include 5 demo flights. Click Next, then Install.
- Leave Open StarLog now ticked and click Finish.
StarLog opens in its own window. To find it again, use the desktop icon or type StarLog in the Start menu. To keep it handy on the taskbar, right-click StarLog in the Start menu and choose Pin to taskbar. The pin and the open window share one icon. If you pinned StarLog before version 3.35 and see two icons, unpin the old one and pin it again.
A quick tour with the demo flights
StarLog comes with five sample flights in a folder called Demo flights. Each has two logs, the rocket's own and the Moon Base's radio copy. Use them to find your way around before your first launch.
- Flights 5, 6 and 7: a LOC Precision 4" Goblin, twice on an AeroTech H100W-14A motor and once on a J350W-14A.
- Flight 8: a minimum-diameter rocket that goes past Mach 1. Look at its acceleration chart for the jump as she goes through the shock wave, and the purple Shock wave box that explains it.
- Flight 9: the chute never came out. See what the debrief says when a rocket comes in at 131 ft/s.
The screen
- Top right: the ft | m switch, the connection status and the Reconnect button.
- Connected to Moon Ship (or Moon Base): the panel for a plugged-in device. Until you connect one it reads No device connected.
- This computer: every flight saved on your PC, newest first.
- The flight view: the numbers and chart for the flight you click.
Looking at a flight
- Click a flight in This computer. Its key numbers appear at the top: peak altitude, maximum speed, boost acceleration, time to apogee, descent rate and flight time. Feet come first, with metres alongside. To put metres first, click m in the ft | m switch at the top; StarLog remembers your choice. Under the maximum speed is Max Q, the hardest the air pushed on the rocket on the way up (dynamic pressure: half the air density times the speed squared), in psi, or kPa with metres first (StarLog 3.48 or newer). StarLog works out the air density from the pad's pressure and temperature when the log has them, otherwise from a standard day, and marks the figure (est.) when the speed or the air was estimated. If the log comes from a barometer-only altimeter and the rocket passed Mach 1, the charts may show a sudden jump (a big negative g, a speed spike): that's a shock wave sliding over the altimeter's vent holes, not a real hit. StarLog 3.56 or newer marks the spot with a purple band and a small purple tick at the top, and a purple Shock wave at X s box under Flight details shows the data as recorded; click Smooth through it to bridge the jump, or Show as recorded to go back. Hide shrinks the box to a small purple Shock wave chip; click the chip to bring it back. The Flight Debrief notes it too.
- Use Altitude, Speed and Acceleration above the chart to switch views.
- Move the mouse along the chart. A dashed line follows it, and the strip above the chart shows the exact time and values at that moment.
- To zoom in, drag across the part you want, or use the mouse wheel or touchpad. ↺ Reset zoom goes back to the whole flight, and ⤢ Expand chart makes the chart bigger.
- Click 📋 Rocket Team Report for a post-flight debrief worked out from the log: how the boost went, when the chutes came out, how fast it came down, and anything worth a look before the next flight. Anything marked (est.) was worked out from the readings rather than recorded by the altimeter.
Reading the chart
- When a flight has both logs, the rocket's log is the solid line and the Moon Base's copy is the dashed blue line.
- On the Speed view, ↓ means the rocket is coming down: ↓ 45 ft/s is 45 ft/s on the way down.
- On the Acceleration view, 1 g means at rest. With a log from an altimeter that has its own accelerometer (a Featherweight Blue Jay, for example), the chart shows the reading along the rocket on the way up, then the total pull from every direction from apogee on, since the rocket hangs sideways under the chute.
- Red bands on the Moon Base's log mark moments when the radio signal dropped. The rocket's own log has no gaps.
- Dashed lines mark the chutes. Drogue charge and Main charge come from altimeters that record their charges. (est.) markers are StarLog's estimate from the log. When a chute clearly opened at a different time from its charge (for example, a backup altimeter firing after the primary), both are shown.
- The box in the top-right corner of the chart shows the rocket and motor. Hide tucks it away into a Flight details button that brings it back. To change them, click Details on the flight in the list.
Comparing flights and keeping a logbook
Compare up to six flights
- Tick the box beside two or more flights in This computer, up to six.
- They appear together on one chart, each in its own colour, with a legend naming them. The strip above the chart shows every flight's value at the same moment.
- Zoom works the same way. Clear unticks them all and goes back to a single flight.
Try it with the demo flights: compare the J350W-14A flight with an H100W-14A flight to see what a bigger motor does.
Compare with a simulation (predicted vs actual)
Besides comparing up to six flights, you can bring in the flight your simulation software predicted and lay it over what really happened. StarLog reads OpenRocket design files (.ork) directly, and simulations exported as CSV files from OpenRocket, RockSim and RASAero. You need StarLog 3.22 or newer, and 3.44 or newer for .ork files and linked simulations.
1. The quickest way: import the OpenRocket design (.ork)
- In OpenRocket, run the simulations you want (the same motor as the flight, and the launch site's conditions if you entered them), then save the design. OpenRocket keeps each simulation's results in the .ork file.
- In StarLog, click Import file… in This computer and choose the .ork file.
- StarLog lists every simulation saved in the design, with its motor and predicted peak. Pick the motor to start with and click Import. A simulation that hasn't been run yet shows not run yet: run it in OpenRocket, save, and import the file again. If the design has only one simulation, StarLog imports it straight away.
- The whole design comes in as one simulation under Simulations, with the rocket and motor filled in. StarLog keeps only the time, altitude, speed and acceleration, not the launch site's position.
To see the same rocket on another motor, click the simulation's Details and pick from Motor (a simulation from the OpenRocket design) (StarLog 3.45 or newer). Each flight you link can use its own motor from the design, so one imported design covers every motor you fly in that rocket.
Added a motor later? Add and run its simulation in OpenRocket, save the design, and import the .ork file again. StarLog recognises the rocket and updates the simulation it already has, with the new motor in the list. Your flights stay linked to the motors they were linked to.
Or export a CSV from OpenRocket
- Open your rocket's design in OpenRocket and go to the Flight simulations tab.
- Run the simulation that matches the flight: the same motor, and the launch site's conditions if you entered them.
- Select the simulation and click Plot / export, then open the Export table as CSV file tab.
- Tick at least Time, Altitude, Vertical velocity and Vertical acceleration. More columns do no harm.
- Leave the field separator as a comma, and keep the field descriptions and the comment character (#) as they are.
- Click Export and save the file somewhere easy to find, for example your Desktop.
From RockSim or RASAero
Use the program's option to export simulation results as a CSV (comma-separated) file, with time, altitude and vertical speed included. Any units are fine (feet or metres, ft/s or m/s): StarLog reads them from the column headings.
2. Bring it into StarLog
- In This computer, click Import file… and choose the CSV file you exported. (A .ork file is brought in as described above.)
- StarLog recognises it as a simulation and asks which rocket and motor it's for, from the same lists as your flights. It fills in the motor if the file name gives it, for example Goblin H100W-14A.csv. Click Save details.
- The simulation is listed by its rocket and motor under the purple Simulations heading (in the flight view and on the chart it carries a Predicted tag). Click it to see the predicted flight on its own, or click its Details to change the rocket and motor later.
3. Link a simulation to its flights
Link a simulation to a flight once, and StarLog remembers which prediction goes with it, however many flights and simulations you collect. One simulation can be linked to many flights, for example every test flight of the same rocket on the same motor.
- Click Details beside the flight.
- In Simulation to compare with, pick the simulation. An OpenRocket design is listed once for each of its motors. Those with the flight's motor are listed first, marked (same motor).
- Click Save details. The simulation's row shows how many flights are linked to it; hover over it to see which.
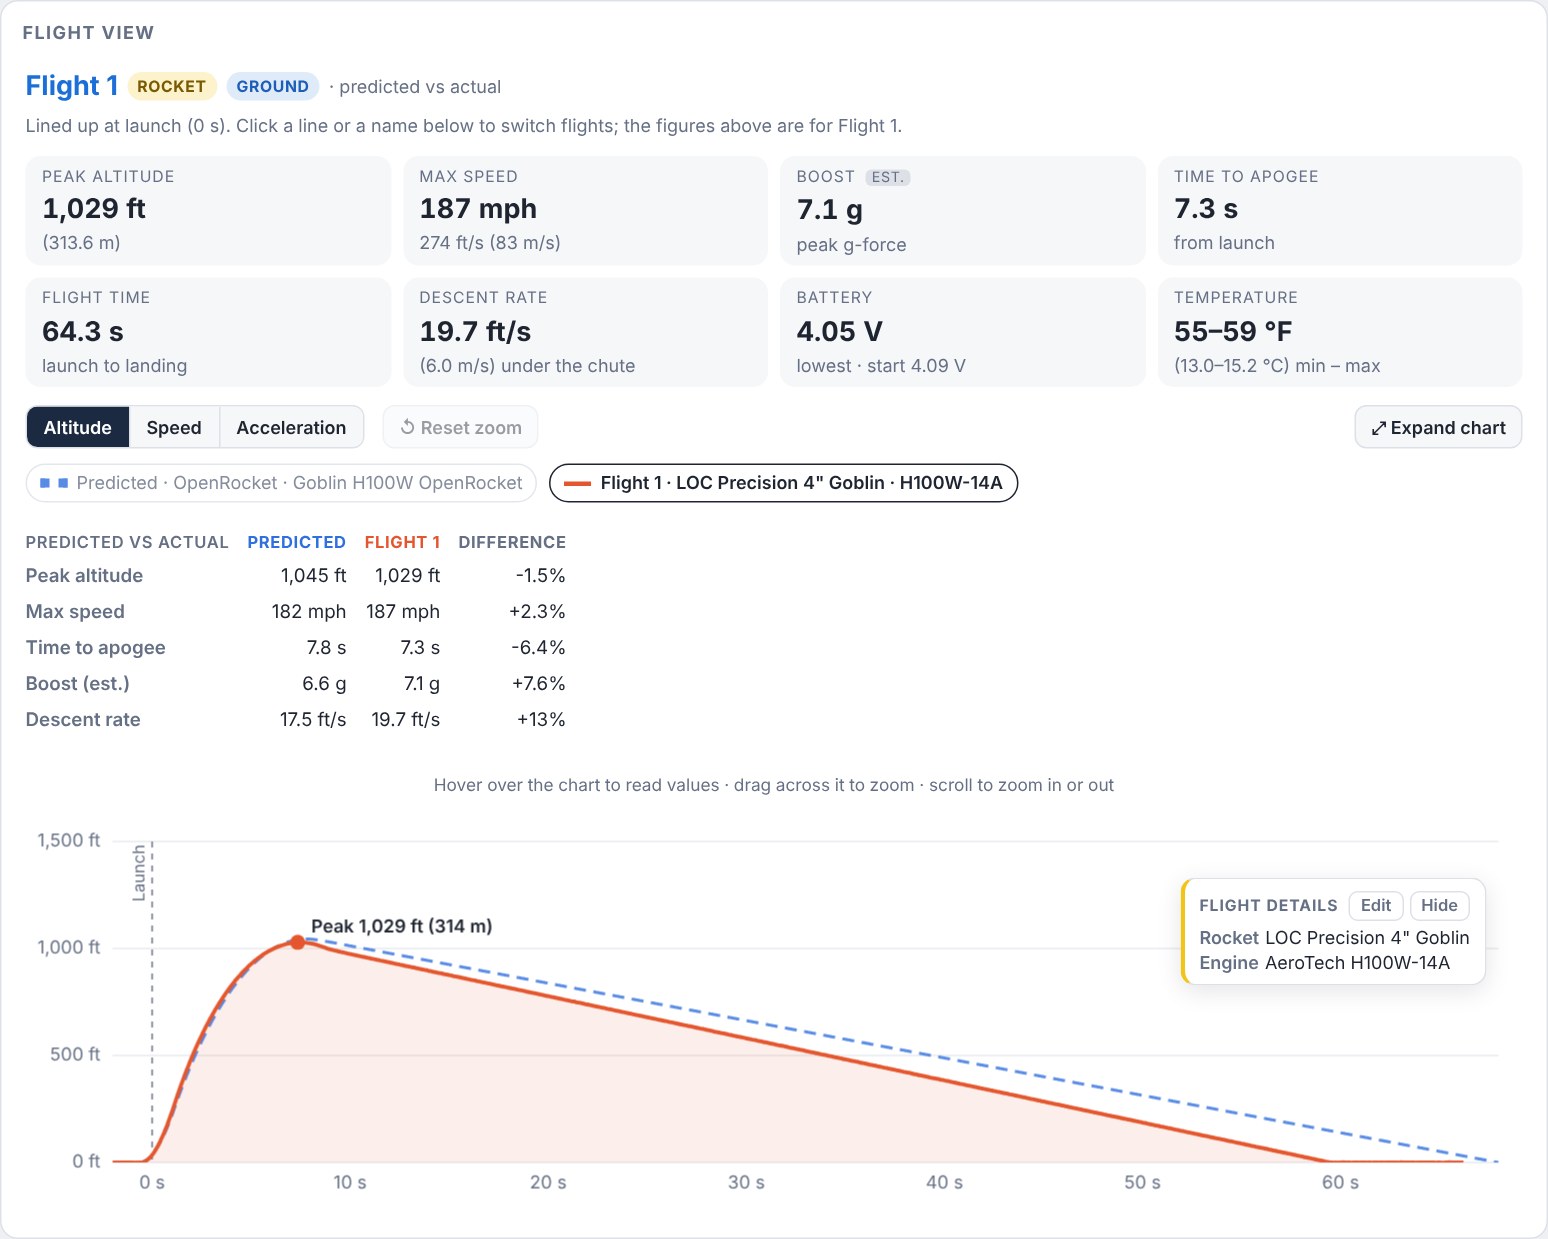
- Now when you click the flight, a Compare with simulation button appears above the chart. Click it to see predicted vs actual straight away.
To unlink, pick None in the flight's Details.
4. Compare predicted with actual
- Tick the simulation and one of your flights.
- The prediction appears as a dashed line, lined up with your flight at launch.
- Under the chart, Predicted vs actual lists the peak altitude, max speed, time to apogee, max Q, boost and descent rate for both, and the difference in percent.
- Tick more flights to see them all against the same prediction (up to six lines in all). The table compares the prediction with the flight you click.
- Click 📋 Simulation Debrief above the chart for a written debrief (StarLog 3.45 or newer). It says how close the prediction was, where the two curves part ways (under thrust, which points at the motor or the mass, or in the coast, which points at drag or weathercocking), how the chute compared, and what to change in OpenRocket so the next prediction lands closer.
To remove a simulation, click the × beside it. It goes to the Recycle Bin.
The Simulations list is folded away until you need it: click ▸ Simulations to show or hide it. StarLog remembers your choice, and opens the list by itself while you're looking at a simulation or comparing one with a flight (StarLog 3.25 or newer).
Tip: StarLog lines every flight up at the moment it passes 33 ft (10 m), so the simulation is lined up the same way. Its time to apogee may differ by a fraction of a second from the figure OpenRocket shows, which counts from ignition.
Record what you flew
- Click Details on a flight.
- Choose the rocket's maker and model and the motor's maker and model from the lists, or type new ones. StarLog remembers them for next time.
- Click Save details.
Sort the logbook
Above the list, choose Flight, Rocket or Motor to sort and group your flights. Grouping by motor is a quick way to compare every flight on the same motor.
Downloading your own flights
Connect a device
- Open StarLog.
- Plug the Moon Ship or Moon Base into your PC with a USB-C data cable. Switch the Moon Ship on; it chirps three times when it's ready. Leave the Moon Base switched off: USB powers it, and its switch only connects the battery. The very first time you plug a device in, Windows may take a few seconds to set it up.
- Within a few seconds StarLog finds it by itself. The status at the top right turns green and the panel title changes to Connected to Moon Ship or Connected to Moon Base. With firmware V12 or newer, the device gives one short chirp so you know which one StarLog is talking to. If nothing happens, click Reconnect.
You can plug in both at once. A Moon Ship / Moon Base switch then appears at the top of the panel.
Download
- Download latest flight saves the newest flight on the device.
- Download selected saves the flight you've clicked in the panel.
- Download all saves every flight that isn't on your PC yet. Flights already saved are skipped.
Flights already on your PC are marked Saved as Flight N. StarLog checks each file's contents, not just its name, so a new flight is never mistaken for an old one. A saved flight is never overwritten. When the rocket's log and the Moon Base's log are of the same flight, StarLog pairs them under one flight number.
Free up space on the device
Erase rocket memory… (or Erase Moon Base memory…) deletes every flight on the device. Leave Save all flights to this computer first ticked and anything not yet saved is downloaded before erasing. To confirm, type ERASE and click Erase. Flights already on your PC are not affected, and the next flight starts again at File 01 on the device while StarLog's flight numbers keep counting up.
Preflight a device
Preflight device… in the panel tests the connected Moon Ship or Moon Base (firmware V12 or newer) and shows a tick or a cross for each part. The window stays open until you close it. Keep the device plugged in.
- Moon Ship: battery, altitude sensor, sensor response (when it chirps, lift it straight up about 3 ft or 1 m and hold it), memory, charging, radio link to your Moon Base (switch the Moon Base on nearby; 30 seconds) and buzzer.
- Moon Base: microSD card, radio link to your Moon Ship (switch the Moon Ship on nearby; 30 seconds), and the four lights and buzzer, which you tick as you see and hear them.
If a row fails, fix it (for example, switch the Moon Base on) and click Test again on that row. Run whole check again repeats everything. Each check is saved as a report in Documents › StarLog › Device checks, and Email report opens your email with the report filled in and addressed to support@flystarlog.com. The device signs its results, so StarLog can tell they came from it unchanged.
Download latest flight and Preflight device… are grey until a device is plugged in, then yellow. Each turns green when it's done: ✓ Latest flight saved once the newest flight on the device is on your computer, and ✓ Preflight passed once every test passes. If a test fails, the button stays yellow with Caution: Preflight failed checks. under it. Unplugging the device turns them grey again (StarLog 3.26 or newer).
Files from elsewhere
Import file… adds a log from a microSD card reader or from someone else's StarLog. It also reads logs from other altimeters (PerfectFlite, Altus Metrum, Eggtimer, Featherweight, Jolly Logic, Missile Works and others): any CSV file with a time column and an altitude column. It also opens the .eeprom file AltosUI saves when it downloads an Altus Metrum EasyMini. If StarLog can't read a file, it says why. Some altimeters save each flight as two files, a fast motion file (accelerometer and gyro) and a slower one with altitude: load the one with altitude (on a Blue Raven, the file with LR in the name). Some Blue Raven backup files hold the start of the flight twice; StarLog 3.57 or newer and StarLog Flights read it as one flight. If a log holds more than one flight (the altimeter was left on between launches), StarLog 3.58 or newer imports each flight on its own and says so, for example "This log holds 2 flights. Imported as Flight 8 and Flight 9." On StarLog Flights, the upload page lets you pick which flight to upload; choose the file again for the next one. StarLog sets the ground from the pad readings before lift-off, so a barometer that reads low going supersonic doesn't add to the peak. A spreadsheet needs saving as CSV first. For a custom-built board, or an altimeter StarLog doesn't know yet, email MoonBeam Support at support@flystarlog.com with the log and ask us to add it. Altitude is read as feet unless the file says metres. These flights are tagged Other, and on StarLog Flights they're listed but never ✓ Verified. If the log has its own accelerometer and speed readings (for example a Featherweight Blue Jay), StarLog uses them for boost and top speed instead of estimating, and files the flight under the date in the file. If the log records when its charges fired (an Eggtimer's Drogue and Main columns, for example), the report and the chart use those times for the drogue and main.
Flights from StarLog Flights
You can open any flight from StarLog Flights in StarLog and compare it with your own, for example the leader's flight on the same motor. You need a StarLog Flights account and StarLog 3.19 or newer.
Link StarLog to your account (once on each computer)
- In StarLog, click Link to StarLog Flights… at the top of the window, then Link.
- Your browser opens StarLog Flights. Sign in if asked, check the code matches the one StarLog shows, and click Link this StarLog.
- StarLog shows Linked as and your name at the top, and a gold Open StarLog Flights button that opens the StarLog Flights home page with all the listings (StarLog 3.47 or newer). If the flight on screen hasn't been uploaded yet, the button asks Upload Current Flight? first: click Upload and open, or Just open StarLog Flights (StarLog 3.53 or newer). That's it.
Open a flight
- On StarLog Flights, open the flight and click Open in StarLog.
- Within a few seconds StarLog opens it. If StarLog is closed, it starts by itself (StarLog 3.34 or newer; the first time, your browser asks whether to open StarLog: tick Always allow).
- Flights from the website are listed under From StarLog Flights, apart from your own flights, with the flier's name and ✓ Verified when the flight was signed by a registered device. They never take one of your flight numbers. Click the From StarLog Flights heading to fold the group away or show it again. To remove one from StarLog, click its ×. It goes to the Recycle Bin and stays on StarLog Flights.
- Tick it and one of your own flights to see both on one chart.
To stop receiving flights, click StarLog Flights: at the top of StarLog and choose Unlink, or unlink the computer on your account page on StarLog Flights. Each account can download a limited number of flights per minute, hour and day.
Upload your own flights (StarLog 3.23 or newer)
- When StarLog saves a new Moon Ship flight, downloaded or imported, it asks Upload this flight to StarLog Flights? Click Upload to StarLog Flights. If StarLog isn't linked yet, the button says Link and upload… and links it first.
- Your browser opens the upload page with the flight file already attached, signature and all. Add the rocket, motor and launch site and click Upload flight.
- To upload a flight later, open it in StarLog and click the gold Upload to StarLog Flights button at the top right of the flight view. Once it's sent, the button changes to gold Finish on StarLog Flights and the flight has an amber • beside its name in This computer: the flight is waiting on the website's upload page, and it only shows on StarLog Flights after you add the rocket, motor and launch site there. A couple of minutes after you finish, the button changes to ✓ On StarLog Flights (it opens the flight on the website) and the • becomes a green ✓ (StarLog 3.52 or newer) If you dismiss a waiting flight on the website instead, StarLog offers Upload to StarLog Flights again. A flight flown in an earlier year is filed in that year's season on StarLog Flights: choose All seasons to see it.
No internet at the field? Upload anyway. StarLog keeps the flight, marks it waiting to upload in your list, and sends it by itself as soon as you're back online and StarLog is open. It then tells you the flight is ready to finish. Flights StarLog has sent wait under Waiting to finish on the website's upload page, from any computer or phone, until you finish or dismiss them. Tick Don't ask me again if you'd rather StarLog didn't ask; the Upload button still works.
Staying up to date
When your PC is online, StarLog checks for updates when it opens and every hour. You stay in charge: nothing installs until you click.
Moon Ship and Moon Base firmware
- StarLog downloads new firmware by itself and checks it.
- Plug in the device. The bottom of its panel shows, for example, Firmware V10 · V11 available.
- Click Update firmware…, then Update, and keep the cable in until the device restarts. It takes a few seconds.
- The panel then shows Firmware V11 · up to date.
The device keeps its flights and its pairing. If the cable is pulled partway, it keeps running its old firmware, so it can't be left unusable. Firmware can't be updated during a flight.
StarLog itself
When a newer StarLog is out, a blue banner appears at the top: StarLog 3.15 is available. Click Update now and StarLog downloads it, checks it, closes, installs it and reopens as the new version, with all your flights in place. A small Setup window shows the progress for a moment. Later hides the banner until StarLog is next opened.
Where your flights are kept
Everything is on your own PC, in Documents › StarLog. There's no account and no cloud. If your Documents folder is kept in OneDrive, the StarLog folder is there too.
| Folder or file | What it holds |
|---|---|
| StarLog Flights | One folder per day of flying, plus Demo flights. Each flight is a plain CSV file that spreadsheets such as Excel can open. |
| firmware | Moon Ship and Moon Base updates StarLog has downloaded |
| starlog_activity.log | A record of what StarLog has done, useful if you need help |
Open folder in StarLog shows the flights in File Explorer. To keep a backup, copy the StarLog folder to a USB drive or another drive now and then.
Deleting flights
- One flight: click Details, then Delete flight…, then Delete.
- Everything, including the demo flights: Clear saved flights… at the bottom of the list, then type CLEAR to confirm.
Deleted flights go to the Recycle Bin, so a mistake can be undone: open the Recycle Bin, right-click the file and choose Restore. Flights on your Moon Ship or Moon Base aren't touched. StarLog's flight numbers close up after a delete, so they always run 1, 2, 3 with no gaps: the flights after a deleted one move down by one (StarLog 3.54 or newer).
Uninstalling
Open Settings › Apps › Installed apps, find StarLog, click ⋯ and choose Uninstall. Your flights in Documents › StarLog are kept, so they're still there if you install StarLog again.
Troubleshooting
StarLog explains problems with the device in the yellow banner at the top, and the message stays until the problem is fixed. Other problems, such as a file that can't be imported, appear in a red bar at the top with the time they happened, and stay until you click ✕.
| You see | What to do |
|---|---|
| Windows protected your PC when installing | Click More info, then Run anyway. |
| Rocket not found | Check the device is switched on, wait for the Moon Ship's three chirps, and click Reconnect. Still nothing? Try a different cable, since charge-only cables are common. |
| COM… is being used by another program | Another program on your PC is using the device's connection. Close any other program that talks to USB devices, then click Reconnect. |
| The device on COM… didn't answer | Unplug the device, plug it back in, wait a few seconds, then click Reconnect. |
| Moon Base: SD card reader isn't working | Push the microSD card fully into the Moon Base, switch it off and on again, then click Reconnect. |
| Rocket: altitude sensor isn't responding | Don't fly. Switch the Moon Ship off and on again. If the message stays, email support@flystarlog.com; its stored flights can usually still be downloaded. |
| StarLog's background program has stopped (older versions said Failed to fetch) | Close the StarLog window and open StarLog again. Your flights are safe. StarLog 3.23 and newer keeps running while its window is minimised, so this is rare. |
| An update says it couldn't be installed | Nothing was changed. Check your internet connection and try again later. |
| StarLog doesn't seem to open | Look for its window in the taskbar; it may be behind another window. If it opens in a browser tab instead, that's fine: everything works the same. |
Getting help
If something isn't working, send us the activity log. It shows what StarLog was doing and saves a lot of back and forth.
- In File Explorer, open Documents › StarLog.
- Attach starlog_activity.log to an email to support@flystarlog.com, along with a sentence about what happened. If there's also a starlog_error.log, attach that too.
You can also see the same record inside StarLog: click Show log next to the version number at the top.
StarLog™
Lane Bush, developer
Thank you for flying with StarLog. We'd love to hear how your first launches go.